Return to the Ratropolis website. Like us on Facebook.

Showing posts with label Rat Cage Accessories. Show all posts

Tuesday, January 5, 2016

Dual Critter Nation Convertible Top/Bottom Level Liner

Convertible Level Liners Used on the Left Side of the Cage

Have you ever been frustrated by the fact that the liner color you need is only available for the Top of the Critter Nation and you need it on the bottom? Or Vice Versa?

I am trying out a liner design that could be used on either the top or the bottom as needed. You basically cut the fabric like you would for the top, but only cut one edge of the ramp cutout (I will call this the "notch"), leaving the other edge attached. I cut the short edge, but you could cut the large edge if you prefer.

Sew the fleece to the U-Haul furniture pad like normal, sewing around the notch. Use a small 1/4" seam allowance along the notch (to minimize the notch gap).


Cut one side of the ramp opening, but leave the other side attached.
Sew around the notch using a small 1/4" seam allowance.

Turn the liner right side out and top stitch as desired. In the liners I did, I added top-stitching across the surface of the liners to try to discourage the rats from chewing their way in between the layers of the liner.

The finished liner should look something like mine, shown below:

Finished Top/Bottom Convertible Liner

You can now use this liner on the bottom, using a large binder clip to secure the notch closed:

The middle binder clip holds the notch closed.

Or you can use the liner on the top, folding the portion of the liner that covers the ramp opening underneath the liner and securing with a binder clip as shown:

The extra flap of liner is folded under and clipped in place.
You may not want to go this route if you move heaven and earth to keep your rats from burrowing under the liners, as they will likely be able to get under using the notch when placed on the bottom pan. My current rats have mellowed as they have aged and while they did a lot of liner diving when they were little, they are less inclined to do so now. Only time will tell if this design holds up to my current rats, although I believe it will work as well as the standard design.

Tuesday, January 6, 2015

An Insulated Carrier Cover: For When You Have to Go out with Your Rat in Freezing Temps

Insulated Cover for Those Extremely Cold Days

Yesterday was Jeremy's pre-neuter appointment. Unfortunately, it was also 1 degree outside with wind chills below zero. I made sure to warm up the car, but he would still need to make it from the car to the vet's office and back in these dangerous temperatures.

I have used fleece, blankets, and towels in the past to cover the carrier when it was cold, but it always seems the cage can be too exposed that way. Either the entire carrier isn't covered or the cover blows up or the cover is uneven. If the cover is too large, it gets in the way. If it is too small, something isn't covered. And it is more difficult to grab the handle through the cover. If it is windy, it seems sometimes the wind goes right through the cover anyway.

Cover Next to the Carrier
To solve these problems on this extremely cold day, I decided to create a carrier cover designed to fit his carrier, allow me to hold the handle directly, and protect him from the wind. I wanted something a little more insulated than just fleece or fleece and flannel/cotton, so I decided to use the same materials I use for the cage liners: One layer of fleece for the outside, and one warm insulated layer of U-Haul furniture pad for the underside to protect him from the chill of the wind.

I made my cover in a hurry in the hour before I had to leave for the appointment, so I did not have time to photograph the process. If you are interested in making one yourself to fit your own carrier, I have included a brief description of the process below. It is very similar to making a cube/rectangular prism, except there is no bottom, so you need to clean finish the bottom edges of the side pieces together first if you want a finished edge along the bottom. You will need a sewing machine capable of sewing through many layers and a needle for heavy fabrics (sewing the top to the connected sides is the hardest part - particularly the corners where you need to sew over the side seams).


Petmate Look 'N See Portable Kennel
The carrier that I use is the Petmate Look 'N See Portable Kennel, discussed in this post. To make the cover, I simply measured the three dimensions of the carrier (length, width, height) and added at least one inch to each dimension for seam allowance (you can add a little extra to ensure a loose fit and protect against shrinkage). I then cut from fleece two long side pieces (21" x 11"), two short front/back pieces (12" x 11") and one top piece (21" x 12"). I then cut another set of pieces using the U-Haul furniture pad.

To prepare the top piece, I put the fleece top piece on top of the furniture pad top piece, right sides out/wrong sides together and pinned them together. I put the top piece on top of the carrier and marked the position of the handle. I then cut a slit in the top piece (through both fleece and furniture pad) and made sure the handle fit through the slit. I made it a little larger than necessary so I would be able to adjust the position of the cover lengthwise slightly if needed.


Slit style handle opening
To finish off the raw edges of the handle opening, I sewed around the opening with a zigzag stitch (kind of like a super large button hole). I then put this piece aside and worked on building the sides of the cover. NOTE: If you want a larger opening, you can make a rectangular opening the same way you would make an opening on a cube. This would leave more open space around the handle, which wouldn't be good for me, since my carrier is all wire on the top. The slit style opening keeps the carrier covered better, so I used that method instead.

For each of the four side pieces, I first created a finished bottom edge on each piece by doing the following: I put the fleece and furniture pad pieces right sides together and sewed them together along the bottom edge. I trimmed the seam allowance and flipped them right side out and top stitched along the sewn side, finishing off the bottom edge. Once that was done for each side piece, I sewed each side piece to the adjacent side, just like making a cube/rectangular prism, with fleece sides together (furniture pad side facing out), making sure the finished bottom edges were aligned. When they were all connected in a straight line, I folded the long strip fleece sides together so that the last piece sewn met the first piece sewn, and sewed the last piece to the first piece, making a closed rectangle. I then trimmed all the seam allowances.

When all four sides were sewn together, I turned them inside out and pinned the carrier top to the top edge of the sides, fleece sides together (furniture pad side out), the same way you would attach the top of a cube. I sewed the top piece to the sides around all four edges, just like attaching the top of a cube. Note that this will be very thick at the corners and you will need a sewing machine and needle capable of sewing through all the layers.

Once the seam allowances were trimmed, the cover could be turned inside out and then placed over the carrier to protect the rat from the weather.

Cover lifted a bit in front to expose door.
Note that this cover will limit ventilation. I do not use the cover inside the car (or if I did, I would life the front portion up to promote airflow), as I prefer to have the ventilation when possible. I am only planning to use this cover when making the trip in and out of the car in extremely cold weather.

A similar cover could be constructed for more regular use out of lighter materials if desired.

On a side note, Jeremy got the thumbs up to go ahead with his neuter. He will be going in a week from Wednesday.

Friday, November 14, 2014

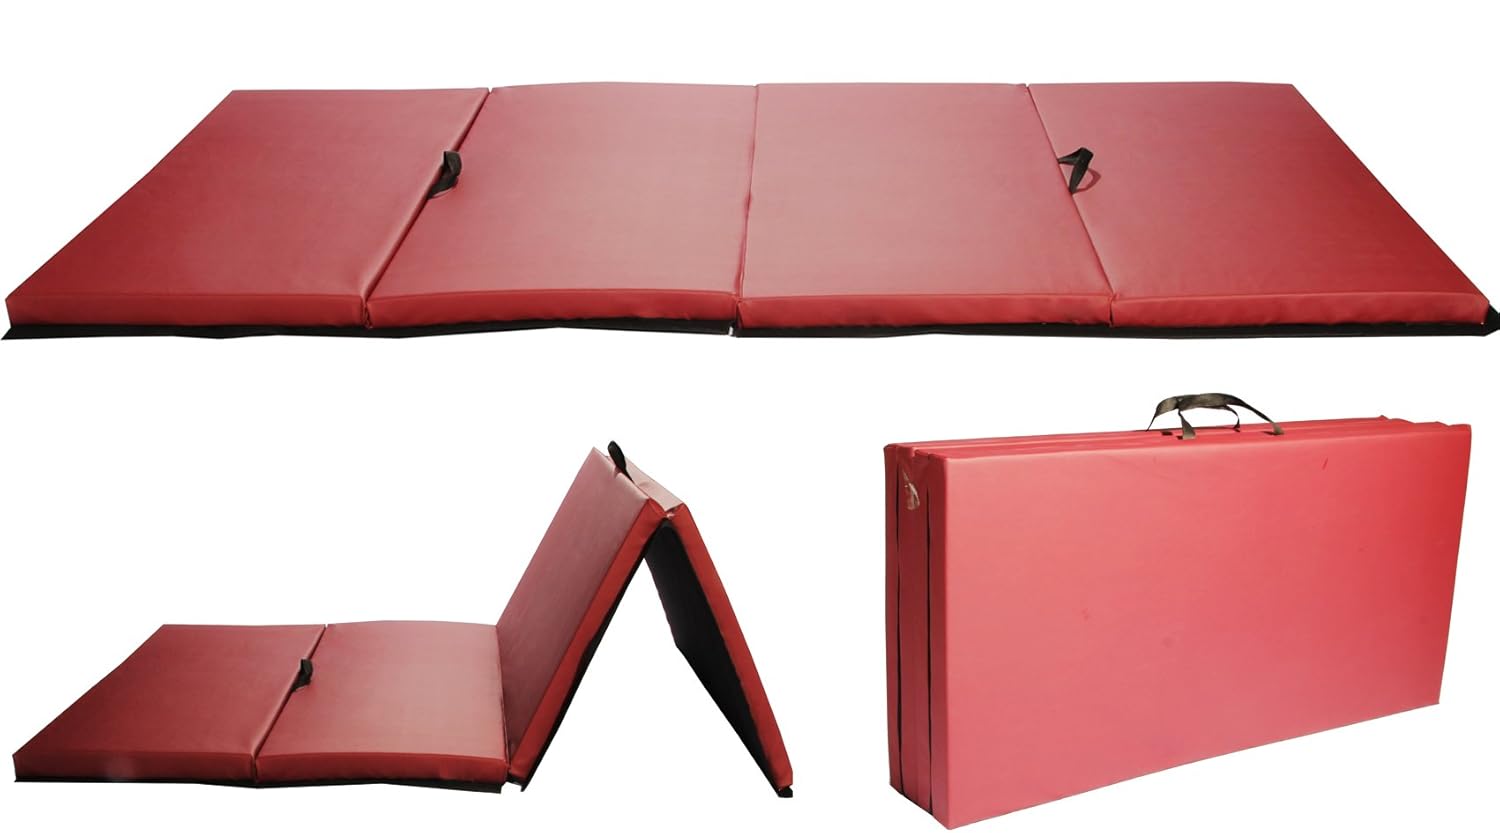
BestMassage Gymnastics Mat

Gymnastic mat under the loveseat protects against falls.

The BestMassage gymnastics mat I ordered after Bobo's fall arrived earlier this week. The mat is 4' x 8', large enough to cover the area to the sides and in front of the loveseat. It is 2" thick and very firm, yet provides plenty of cushion in the case of a fall. I am happy with the construction. It appears very durable, although whether or not it will hold up to rat chewing has yet to be seen. It may be that with time, the loveseat legs may tear the cover, but for now, it is holding up extremely well. I did reinforce the area where the legs rest with a piece of duct tape and a scrap piece of furniture pad.

http://ecx.images-amazon.com/images/I/61bQhxN1H7L._SL1500_.jpg
BestMassage Thick Folding Panel Gymnastics Mat
A few reviewers complained about a smell of volatile gases upon opening the box. I made sure to order from an Amazon vendor from which other reviewers reported no smell (Cavalier Wholesale). This mat arrived completely odorless, but I did leave it upstairs for a while to vent just in case.

I really like the protection and peace of mind this mat offers. If it proves to hold up well, I may order a second one to protect the center play area of the rat room. A mat like this would also be nice on the floor of a play pen or free range area to protect the carpeting or hardwood flooring underneath it. Again, I don't know how this will hold up over time, but my first impression is very positive. I just wish I would have thought of this before Bobo had his fall.

Monday, November 10, 2014

The Barn - Fall Cage Accessories

You can easily make a fall barn hide using the House pattern in the
Tutorials for Common Rat Hammocks

It is time to put the Halloween hammocks away and start decorating the rat cages for fall. I created my first fall hammocks last year (see Fall Decorating Ideas), with pumpkin hides, a snuggle sack full of fleece leaves, and maple leaf-shaped flat hammocks.

This year, I spotted a fabric I just knew I had to have. It was available from Fabric.com and it was more than I usually pay for rat hammock fabric (knowing that they will just chew it up). But I fell in love with it and bought it anyway (good thing I did - it is no longer available). The fabric features an apple/pumpkin farm, scarecrows and sunflowers, and lots of fall birds looking for something good to eat. Everything I love about fall in one colorful print. It even had a coordinating leaf print.


I put together a standard DCN hammock set and then realized that what would really bring it to life would be a barn hideaway. Fortunately, I had already created a pattern for a house (used to make haunted houses and gingerbread houses) and it could easily be used to craft a barn without any modifications. You can find the instructions in the Tutorials for Common Rat Hammocks and Accessories PDF.

Using that tutorial, I put together the barn shown above to serve as the centerpiece of the set.


And this is the cage decorated for fall:


There are rats in the barn! Burt and Hammie during in-cage intros.

Saturday, August 16, 2014

One week with Jeremy, Hammie, and Bobo

Yesterday, Jeremy, Hammie, and BoBo got brand new hammocks in their quarantine cage. I like to make a new set every time we get new rats - something that I will always associate as being uniquely theirs. Plus, the boys were staying in some flowery hammocks, as all my unused sets were either flowers/butterflies for the girls or holiday themed. They needed something gender neutral and I had just the fabric.

I actually bought this fabric a while back from fabric.com and it was intended for hammocks for Casper. But when the vet diagnosed his lung tumor, I didn't want to spend my spare time sewing hammocks - I wanted to spend more one-on-one time with Casper, so I never used it. It features white mice (but they make good rats as well), both males and females, and their obsession with stealing and eating blocks of cheese. It was from the Lewe and Norton line of fabric, and unfortunately, this particular cotton print is no longer available on their site. The coordinating fabrics have been discounted, so I am guessing they will no longer be carrying it.

Jeremy in Cuddle Cup
In the process of making the hammocks, I think I finally perfected the Rigilene cuddle cup - at least as perfect as I will ever get. I added a second layer of batting so that there is batting on both sides of the Rigilene frame. This also makes the cup more cushy. The Rigilene holds the shape of the cup so they cannot trample over it and flatten it. My rats are much more likely to use this type of cuddle cup than the standard cup without the Rigilene frame. The next time I make one, I will photograph the steps and add it to the tutorial.


Hammie can't wait to see us when we come to the cage.
After spending a week with the new boys, their personalities are starting to come out. Hammie (the one with the beige markings), is definitely the dominant one of the bunch. The boys have had a few squabbles - usually during out time and not while in the cage - and Hammie is always involved. He is not always the instigator, but in the end, he ends up the victor. You can tell they are a little leery of him. But no one has been bitten: no blood, no foul. There have been a few mighty loud squeaks and hard tumbles, but everyone lives together peaceably and shares food, cage, and cuddles just fine. So far, it seems like normal young rat dominance play, but it is something to keep an eye on. Some of the males from this rescue are in line for neuters for hormonal aggression, so it is something to watch out for as these rats mature.

Bobo's abscess was drained and his cuts
and scrapes are clearing up on antibiotics.
Bobo is the sweetie of the group. He loves his people and is a natural born shoulder rat. He loves to be handled and wants to climb out of the cage and into your lap every time you open the cage. He does not like it when another rat climbs on top of him. I am sure he had quite enough of this when he was in an overcrowded cage, and he came to us with the resulting scratches. This experience has made him a little sensitive to being walked on, and he is sure to stand up and challenge anyone who tries. The good news is that we had his abscess drained on Tuesday and he is on trimethoprim sulfa for three weeks to help the abscess to heal without reforming and also to help his scratches heal. His skin is already incredibly improved, with many of the scratches having healed up quickly after starting antibiotics. There is still a slight swell where the abscess was and the vet will be checking in on him next week. We will see what she thinks. However, it is much reduced from what it used to be. If he had fur, I wouldn't even know it was there.

Jeremy curls up with Bobo in the space pod. I don't
think they had one of these in his last home.
Jeremy is the youngest little guy and he is exactly what you would expect from a young rat. He shows no signs of aggression and is comfortable with both Hammie and Bobo. I have caught him curled up near each of them at different times. He is inquisitive and curious and extremely friendly and he is quickly losing his fear of being picked up. Sometimes, you can tell he wants to be picked up, but then he has second thoughts at the last minute. If you are sitting on the floor, he has no qualms about climbing onto your lap and up to your shoulder.

All three boys are just wonderful and we can't wait to move them into the rat room and start introductions. I am certain that intros with Ruby will go well - she is so laid back and sweet and has never had problems being introduced to boys in the past. I can also tell that Ruby is missing her sisters. It must have been hard for her to lose them both in such a short time frame. She was a little quiet and withdrawn when we returned from vacation, but that might also have been from us having been gone for a week. She is starting to come back out of her shell again.

Burt had no problems with intros to the girls (a few scuffles with Jo, but overall, things went smoothly) and has lived with another male in his first home, but I am unsure how he will be with intros to new boys. I am hoping that things will go smoothly since they are so young, but it is possible that Hammie and Burt may have some dominance issues to settle. Burt won't let Hammie boss him around the way Bobo and Jeremy do. And Burt has been known to like a good wrestle - so I worry a little about Bobo getting scratched up during intros. But we will take things slowly when the time comes and see how it goes.

Friday, June 6, 2014

Ferret Nation (and Critter Nation) Exterior Ramp


If you have a Critter Nation or a Ferret Nation cage and you allow your rats some free range time in the same area as their cage, this exterior ramp is a cool accessory to have. It is available from Ferret.com for an after shipping cost of somewhere close to $15 (prices and shipping tends to fluctuate, so check your cart for the actual price).

Our rats love the freedom of coming and going as they please and the ramp provides them access to their water bottles and litter boxes during play time, so I do not need to provide additional ones in the room. And when they are tired of running around and playing, they each make their way back into the cage on their own to snuggle in a hammock and take a nap.

Note that the description claims that the doors can be closed with the ramp in place. I do not believe that is the case. I can see no way to close the doors without damaging them or the ramp. Also, the description lists the compatible Ferret Nation cage models, but does not list any Critter Nation models. The Critter Nation is perfectly compatible with the ramp (and is even printed on the box the ramp comes in).

On an unrelated note, I found a little time to line the furniture pad I had on the floor of the Rat Room with leftover fleece and fleece remnants I had on hand. The result is this bright and cheerful rainbow floor mat. It is easy to clean, absorbant, soft and warm.


Rat Room Floor Mat
Bela Gets Spaghetti All Over the New Mat - Good Thing it is Washable!


Wednesday, April 16, 2014

Crafty Rat Owners DIY Facebook Group

 
Rats and Do-It-Yourself projects go hand in hand. Many commercial rat toys/accessories are expensive, often unsafe for the animal they are intended for, often sized wrong, and tend not to last long. Ordinary household items/recyclables often work just as well or better with a little craftiness and a creative mind.

There is now a Facebook group for sharing your own DIY projects, whether you just want to share what you've made or share tutorials showing how to make them: Crafty Rat Owners DIY Facebook Group.

This is a great place to find new ideas for adorning your cage and for learning to make things you would have never thought of on your own. It is also a good community for sharing what you have done with other like-minded rat owners. The group includes everything from sewing projects, to crafts, woodworking, cage building - anything that you make yourself for the good of your ratties.

Monday, March 24, 2014

Using Rigilene in Your Hammocks

Hammocks Reinforced with Rigilene

Have you ever wanted to make a cube that can stand upright on its own without needing to be hung from the cage bars? Rigilene may be the solution.

Rigilene polyester boning
What is Rigilene? It is a flexible polyester boning used in strapless dresses and swimwear to provide that extra support that keeps everything "up." It is not as firm as some forms of boning, but it can be sewn directly onto fabric and it is machine washable.

I have found that sewing strips of Rigilene into or alongside of the seams in a cube can help it keep that upright shape without sagging or collapsing.

The nice thing about the Rigilene is that it seems to have that perfect balance of support and flexibility. If it is too stiff, it would be hard to work with and difficult to turn the cube right side out when completed. It also would not collapse for easier storage. If it is too flexible, it won't hold the desired shape and will collapse. In my testing of the self-supporting cube, I have found that when placed in the rat's play pen, it maintained its shape as the rats explored it and wrestled inside it. It will support the weight of a rat on top of the cube, but it likely would not allow the rats to climb on top without giving way. However, the rats seemed to sense this and while they put their front feet up against the top, when they felt the boning start to bend a little, they promptly got down and did not attempt to jump on top. So, during out time, the cube held up great without additional support. At the end of the week, when I change out the hammocks, I will leave the cube in the cage to see how it holds up without support.

The cube can be collapsed and stored by pushing in on one corner until it collapses inward, then folding the structure into a square.

The Rigilene comes on a roll and thus has a natural bend to it. You can iron your cut strips to straighten them out. After washing, a little of the curl did return, but it wasn't too bad. Just a slight bowing in some of the sides.

I test washed the cube and it did lose a little of its perfect shape, but still held up structurally (the picture above was taken after it had been washed). I had read that with Rigilene, you need to burn the cut edges of the boning or wrap the ends in scraps of densely woven cotton, or the sharp edges of the boning will prick the garment wearer. Since I was not making a garment, I did not bother to do this, but I should have. After washing, some of the sharper corners started to poke through the fabric. It didn't help that I was using cheap Easter fabric. So, with subsequent projects, I have been burning the tips of the Rigilene with a candle lighter so that they melt slightly and the edges have a smooth finish. I advise you not do this in the same room with the rats as it does briefly emit a chemical burning smell. Or you can just fold a small piece of tough fabric around the edged before sewing.

Once I had the cube figured out, I wanted to see if I could use this material in some of the other hammocks that would benefit from a little support. The most obvious was the tube - using Rigilene to hold the tube open in a circle at either end. Ironically, it was more difficult to use in the tube than I expected. The difficulty comes with using Rigilene in a perfect circle and still being able to sew it into the tube. My first attempt did not work the way I expected, and I ended up just having to sew the circles into the ends by folding the raw edges into the tube and leaving them exposed. I would like to find a more finished way to do this and will continue experimenting. If I just want the tube held open in a tear-drop shape - that is much easier to do. But in my mind, a tube should be circular.

After my experience with the tube, I realized it would be extremely easy to create a tunnel that sits on the ground, with the rigilene keeping the tunnel upright in a half circle shape. The tunnel was the simplest of the projects I tried and came out just as imagined. I used three strips of Rigilene (front, back, and center) to keep the tunnel open, with about six inches between each strip. Down below you can see that Jo really enjoys the tunnel.


Jo Peeks out from the Tunnel
The last project I tackled was an Easter basket. The basket is basically a modified cuddle cup with a Rigilene structure supporting it, a Rigilene handle wrapped in fabric, and no dipped opening. This was by far the hardest of the projects to implement and I swore that I would not attempt it again. The stitching was absolutely atrocious, because it was hard to guide the structure through the sewing maching. However, the final product, despite all the poor craftsmanship was still very nice. I have an alternate idea for constructing it that I will be trying out. I am not sure if that method will end up being harder or easier, but I like the finished product enough, that I am willing to give it a try.
 
I do not have tutorials for any of these projects yet because I am still working out the kinks. I will add tutorials for the projects that I am able to master when I have things figured out to my satisfaction.


Tuesday, March 11, 2014

A DIY Mount for the Lixit Recycled Water Bottle Kit

Snapple Bottle with Lixit Stoppered Tube
in a Home-Made Mount
 

We recently installed a Do-It-Yourself mount for the Snapple water bottle with Lixit stoppered tube watering system to our Martin's Rat Play Pen and may do the same on the travel cage and/or carrier. You may want to consider this if you are using these Lixit kits as your main water system and want to add a few mounts to cages you don't use often without purchasing another complete kit. Or, if you have a the hardware on hand, you might want to skip the kit altogether, and just purchase the stoppered tube. Or perhaps you have a lot of cages and need a lot of water bottles - skipping the kit and building a mount yourself may save you some money.

For the most part, if you only have one or two cages, you are probably best off buying the kit. If you don't have the hardware parts on hand, you may have to buy small things like washers and screws and wingnuts in larger quantities than you need, making the initial investment close to the cost of the kit. However, if you have the hardware on hand or if you need to outfit many cages and thus can afford to buy the initial hardware in quantity, you may want to go this route instead of the kit.

This is what you will need, along with the costs of each item at Menards:

  • 1 Extension Spring (5/16" x 4 13/16"): $1.69
  • 2 Corner Braces (2" x 5/8"): ($1.97 for a pack of 4): $.99 for 2
  • 1 Mending Brace (2" x 1/2"): $.57
  • 2 Wingnuts  (8-32): ($.89 for a pack of 5): $.36
  • 2 Machine Screws (flat ends) (8-32 x 3/4"): ($1.59 for a pack of 7): $.45
  • 4 Washers (1/4" x 1"): ($.99 for a pack of 7): $.56
  • 2 Lanyard Hooks (if purchased in bulk, cost is negligible - I have many on hand from making hammocks)
  • 1 Zip Tie (cost is negligible)
The total cost for one mount comes to $4.34. The stoppered tube usually runs about $5-$6 plus shipping, making the total cost around $10 plus shipping. The kit itself usually runs about $14, so that is a savings of about $4. Like I said, not really worth it unless you are investing in many kits or you already have some of the parts on hand or you just want to add a mount and don't need another stoppered tube.

To assemble the mount, follow these steps:

1. Pass the screws through the holes in the mending brace.

2. Add a washer to each of the screws. I used 1" washers, which work fine on the Critter Nation and Martin's Cages (1/2" bar spacing), but you may need larger washers if your cage has a wider bar spacing.
 
3. Place this piece through the cage bars from the inside of the cage, with the screws passing through the bars and sticking outside the cage.


4. Add two more washers to the screws on the outside of the cage.


5. Add a corner brace to each screw, passing the screw through the top-most hole in the brace.


6. Add wing nuts to each screw and tighten to hold the corner braces firmly in place. (Note: you can use regular nuts as well. I used wingnuts so I could hand tighten and loosen easily.)
 
 
7. Pass a cable tie through the outer holes in the corner braces and secure in place. The zip tie will prevent the bottle tube from slipping out of the mount.


 NOTE: You can attach another mending brace to the outer holes instead, securing it in place with two more screws and two more wingnuts. This would add about $1.38 to the cost of the mount. I think the cable tie will work fine, since the mount is on the outside of the cage where the rats cannot chew it.
 
8.Attach a lanyard hook to each end of the spring. (Note: you can also use springs from other water bottles if you have extras. You may need to make them longer - attaching a split ring to the ends of the spring may achieve the desired effect. The spring accounts for more than 1/3 of the total cost of the mount, so if you already have one or can borrow one from one of your other kits, you will cut the total cost down to $2.65.)
 
 
UPDATE 3/12/14: An alternative to a spring would be to sew split rings to a piece of elastic and attach lanyard hooks to the split rings. This would not be as durable as a spring, but as long as the bottle is mounted to the outside of the cage and the rats do not have access to it for chewing, it should work sufficiently well.

9. Attach spring to cage bars at desired height.


10. Insert water bottle with the tube between the corner braces and then passing between the cage bars, with the stopper resting on the corner braces. Pull the spring around the bottle to hold in place.


Here is a picture of the mount and the whole bottle affixed to a Martin's cage (Martin's Play Pen with Pan):


Note: the stoppered tubes can be purchased from many bird supply retailers. Here are a few that I found via a web search:
 
 
Related Posts:
Installation Instructions for the Lixit Glass Bottle Recycle Kit
Lixit Glass Bottle Recycle Kit: Tube Update
Lixit Glass Bottle Recycle Kit - 7/16" Tube Size (Medium)


Friday, February 21, 2014

Lixit Glass Bottle Recycle Kit - Tube Update

Just wanted to post a quick update that I am trying out the larger tip size (7/16" - Medium Kit) on these water bottles. Since Lixit sells replacement parts, I ordered just the stopper with the tube for a much lower price from a seller on eBay (it is also available from Windy City Parrot, a local bird supply store, but is currently out of stock, and I found it at a few other small private online shops, but was unfamiliar with them, so I went the eBay route this time).

5/16" is supposed to be the appropriate size for rats and I have seen chinchilla sites selling that size for chinchillas, so it should work fine. However, it just seems like my rats have to work so hard to get enough water out, that I want to give the larger tube size a try. I also saw Jo try to bite the bottle tip, so I think she was getting frustrated by the slowness of it.

In the mean time, I have put back one of their Super Pet bottles because I think it is easier for them to drink from it. Or maybe I am just paranoid. We will see how well the larger tube works.

UPDATE: I did a little more research on tube size. Unfortunately, information is limited. I measured the Super Pet bottle tube and it seems to be 3/8", which unfortunately is right in between the 5/16" and 7/16" Lixit tubes. Will the 5/16" be too small and the 7/16" too big? Everything on the Internet that I could find seems to suggest the 5/16" is the recommended size for rats. However, my rats seem to want a larger tube.

I finally found this article on the Rat Whisperer blog: The BEST Water Bottle for Rats. That article reviews the more expensive Lixit Bird Water Bottles. She is using the 7/16" tube successfully with her rats, even though she says that Lixit recommends the 5/16" for rats. So, I am keeping my fingers crossed that this tube will work better for my rats. I really like this water system, so it would be a shame if the tube size got in the way.

UPDATE 2/27/14: The 7/16" tubes work great for our rats and we recommend the 7/16" (Medium) Kit for use with rats.

Related Posts:
A Better Water Bottle? The Lixit Glass Bottle Recycle Kit
Installation Instructions for the Lixit Glass Bottle Recycle Kit
Lixit Glass Bottle Recycle Kit - 7/16" Tube Size (Medium)
A DIY Mount for the Lixit Recycled Water Bottle Kit

Thursday, February 20, 2014

Installation Instructions for the Lixit Glass Bottle Recycle Kit


Lixit Glass Bottle Recycle Kit on a Dual Critter Nation
 
In my previous post, I wrote about my discovery and initial impressions of the Lixit Glass Bottle Recycle Kit. That post got a little long, so I decided to post the installation instructions in a separate post. Installation is very easy and straightforward, and instructions are included with the kit. 
 
The following pieces are included with the kit:


You will need to provide your own 16 oz glass bottle (Snapple bottles work well - I haven't tried any other options) to hold the water.


You will also need a pair of pliers and a large flat-head screwdriver for the one-time installation of the mounting hardware.

 
To prepare the bottle, simply fill it with water (we use filtered water, many use tap water, others use bottled water). Then insert the stopper snugly into the mouth of the bottle. Push and twist to ensure a tight fit.


Set the bottle aside and install the mounting hardware. Start by inserting the bolt through the hole in one of the rectangular washers.


From the inside of the cage, push the end of the bolt through the cage bars, so it is sticking outside the cage, with the washer inside the cage. On a Critter Nation, if you want the nozzle of the bottle to enter through a specific bar spacing, place the bolt about 4 bar spacings above that bar spacing. In the picture below, the bottle nozzle will enter the cage through the bar spacing where the lower text appears.


From the front of the cage, add the second washer. There should now be one washer inside the cage and one washer outside, with the open end of the bolt sticking out of the cage.


Now add the pedestal mount by slipping the bolt through the small circular hole in the mount. (The long slit opening should be perpendicular to the cage). Affix by screwing on the nut. (NOTE: Screw on the nut by hand with the wider end of the nut facing the bolt. You will only be able to turn it for a turn or two. To tighten, you must hold the nut with the pliers and turn the bolt with the screwdriver. I was able to do this by myself, but it was a bit of a handful. It might be easier with two people (and necessary if you are attaching to a side or back wall that is not near a door). The nut is designed to make it hard to turn the bolt so that industrious parrots will not loosen the connection and unscrew the mount.

 
Finally, attach the spring at the desired height based on your water bottle. The water bottle can then be inserted by sticking the tube through the opening on the mounting pedestal and through the cage bars, and pulling the spring around the bottle to hold it in place. The stopper should rest squarely on the pedestal.


Remember to seal the vacuum by tapping on the ball in the tube a few times.
 
 
Related Posts:
 
A DIY Mount for the Lixit Recycled Water Bottle Kit