Return to the Ratropolis website. Like us on Facebook.

Showing posts with label Hammocks. Show all posts

Tuesday, January 5, 2016

Dual Critter Nation Convertible Top/Bottom Level Liner

Convertible Level Liners Used on the Left Side of the Cage

Have you ever been frustrated by the fact that the liner color you need is only available for the Top of the Critter Nation and you need it on the bottom? Or Vice Versa?

I am trying out a liner design that could be used on either the top or the bottom as needed. You basically cut the fabric like you would for the top, but only cut one edge of the ramp cutout (I will call this the "notch"), leaving the other edge attached. I cut the short edge, but you could cut the large edge if you prefer.

Sew the fleece to the U-Haul furniture pad like normal, sewing around the notch. Use a small 1/4" seam allowance along the notch (to minimize the notch gap).


Cut one side of the ramp opening, but leave the other side attached.
Sew around the notch using a small 1/4" seam allowance.

Turn the liner right side out and top stitch as desired. In the liners I did, I added top-stitching across the surface of the liners to try to discourage the rats from chewing their way in between the layers of the liner.

The finished liner should look something like mine, shown below:

Finished Top/Bottom Convertible Liner

You can now use this liner on the bottom, using a large binder clip to secure the notch closed:

The middle binder clip holds the notch closed.

Or you can use the liner on the top, folding the portion of the liner that covers the ramp opening underneath the liner and securing with a binder clip as shown:

The extra flap of liner is folded under and clipped in place.
You may not want to go this route if you move heaven and earth to keep your rats from burrowing under the liners, as they will likely be able to get under using the notch when placed on the bottom pan. My current rats have mellowed as they have aged and while they did a lot of liner diving when they were little, they are less inclined to do so now. Only time will tell if this design holds up to my current rats, although I believe it will work as well as the standard design.

Thursday, May 28, 2015

Efficient Layout for Cutting CN Liners out of U-Haul Furniture Pad


I have been making cage liners for the Critter Nation from U-Haul furniture pads for a while now. I know that one furniture pad is enough to make all the liners for two dual Critter Nation cages, minus one shelf, but only if the pieces are laid out efficiently. Unfortunately, I keep forgetting how they need to be laid out.

So today, I decided to take a picture of the proper layout so that I can remember how it goes in the future. Note that the bottom and top levels are the same dimensions (except for the cutout), so they are completely interchangeable. Also note that you can replace any of the top level/bottom level pieces with two shelf pieces, with the longer edge laid out adjacent to each other (this produces slightly more waste, but is still very efficient).

If you always remember to layout your pieces in this fashion, interchanging them as described above when needed, you will be sure to maximize the number of liners you can cut from one furniture pad.

Saturday, November 29, 2014

Anti-pill Fleece Doorbuster Sale Today at JoAnns


Just a heads up for those who make their own hammocks and liners: JoAnn's has anti-pill fleece 70% off, today only (both in store and online). Solids are just $3.00 a yard. And to top it off, remnants are 75% off the sale price (this is not an advertised sale for the remnants, so I am not sure if all stores put their remnants on sale 75% off or not). That means that if you can find any anti-pill fleece in the remnant bin, it will come to just 75 cents a yard. At that price, I buy anything they have available.

My store even has the fleece available in 2 yard precut pieces, so you can skip the cutting table and get directly in line. This is a huge convenience on Black Friday weekend, when cutting counter lines can be very long.

Monday, November 10, 2014

The Barn - Fall Cage Accessories

You can easily make a fall barn hide using the House pattern in the
Tutorials for Common Rat Hammocks

It is time to put the Halloween hammocks away and start decorating the rat cages for fall. I created my first fall hammocks last year (see Fall Decorating Ideas), with pumpkin hides, a snuggle sack full of fleece leaves, and maple leaf-shaped flat hammocks.

This year, I spotted a fabric I just knew I had to have. It was available from Fabric.com and it was more than I usually pay for rat hammock fabric (knowing that they will just chew it up). But I fell in love with it and bought it anyway (good thing I did - it is no longer available). The fabric features an apple/pumpkin farm, scarecrows and sunflowers, and lots of fall birds looking for something good to eat. Everything I love about fall in one colorful print. It even had a coordinating leaf print.


I put together a standard DCN hammock set and then realized that what would really bring it to life would be a barn hideaway. Fortunately, I had already created a pattern for a house (used to make haunted houses and gingerbread houses) and it could easily be used to craft a barn without any modifications. You can find the instructions in the Tutorials for Common Rat Hammocks and Accessories PDF.

Using that tutorial, I put together the barn shown above to serve as the centerpiece of the set.


And this is the cage decorated for fall:


There are rats in the barn! Burt and Hammie during in-cage intros.

Friday, May 30, 2014

A Fun Rat-Themed Hammock Set


I found this novelty fabric at J&O Fabrics. I have seen it before, but this is the only vendor I can currently find it from, so I suspect it may have been discontinued. I hope not. I really like it.. At the moment, they have 8 yards left in stock. It is designed by Patrick Lose and sold under Timeless Treasures.


This is perfect hammock making fabric. The mouse (rat) theme is one that is not easy to find - or when I do find it, it tends to be too mousy for my tastes. But theme aside, the bright primary and secondary colors set off against the black background make the coordinating fleece colors really pop.


I used some of the Rigilene designs in this set. The tube is held open by rings of Rigilene, keeping the openings from collapsing flat when hung. I am trying out a tunnel with a strip of Rigilene across the top to keep the entrance from falling backwards when left unattended in the cage. We will see how well that holds up. I also used a strip of Rigilene sewn into the cuff of the snuggle sack to keep the sack open in the cage. My rats have never been especially fond of snuggle sacks, so I thought I would try this and see if it is more inviting this way.

Example of how to size the frame
And finally, I made a cuddle cup with a Rigilene frame to keep it from collapsing. Bela is really a fan of the cuddle cup, especially when it doesn't end up squished and flattened in the cage. I made the cuddle cup as described in the tutorial, but built a Rigilene frame like the one shown to the left, and sized it to fit perfectly inside the cup before sewing the cotton/batting cup (outside) to the fleece cup (inside lining), ensuring enough fabric is left above the frame for the seam connecting the cotton to the fleece. Once sized, the frame is removed from the cuddle cup and the cotton/batting cup is sewn to the fleece cup as described in the tutorial, only making the opening through which the cuddle cup will be turned right-side out about 3 1/2" wide. After turning the cuddle cup right side out through the opening, I inserted the frame (it is flexible) inside the cup through the opening, then slip stitched the opening closed once everything was positioned correctly. The only problem I have with this cuddle cup is the top stitching. For some reason, I can never top stitch this item neatly when the Rigilene is in place.


 I couldn't resist the opportunity to create a Peek-a-boo hammock with a rat-shaped opening. I added a zig-zag stitched spiral tail to complement the spiral tails on the fabric.

The following is the DCN decked out in the mouse/rat themed hammocks. I am in the process of making some for Casper as well.


Tuesday, May 13, 2014

3-D Tunnel Tutorial


I received a request for a tutorial for the 3-D Tunnel to which I have been a little slow responding. I would like to make two minor modifications to this tunnel: one that would sew the Rigilene to the fabric once it is inserted so the rats cannot chew a tiny hole and then pull the entire strip out (yes, my rats did this to one of their tunnels), and one that would add a strip of Rigilene across the top so that the opening will not sag back toward the center when left unattended in the cage). I have not had time to experiment with those modifications, so I am posting the tutorial for the original design here in the mean time, while I try to find time to play with those changes.

This tutorial is not yet available in the PDF document and will not be until I have played with the modifications I mentioned above. I will post an update when the PDF document has been updated with this tutorial in its finished form.

This tutorial uses Rigilene for support. See the post Using Rigilene in your Hammocks for more information on Rigilene.

3-D Tunnel Tutorial

1. Cut Your Fabric:

Cotton: 13" x 13" square for the top and 13" x 6" rectangle for the bottom
Fleece: 13" x 13" square for the top and 13" x 6" rectangle for the bottom
Rigilene (1/2" thick): (3) 12" strips


2. Place the two 13"x13" square pieces (fleece and cotton) right sides together. 
    Pin together along two opposite edges (this will be the tunnel opening)
    Sew along pinned edges.
    Trim seam allowances.


2. Turn right-side out.

3. Mark guidelines 3/4" from each seam (using chalk or a disappearing ink marking pen). 
    Mark two more guidelines in the center between the seams, 3/4" apart.
    Sew along each guideline, making a channel for the Rigilene.


4. Place the two bottom pieces (cotton and fleece) right sides together.
    Pin along the short edges (this will be the opening of the tunnel).
    Sew along the pinned edges.
    Trim seam allowances.


5. Turn right-side out.
    Top stitch along the short edges.
 

6. Pin the bottom piece to the top piece along a raw edge, right cotton sides together.
    Sew along the pinned edge.
    Trim the seam allowance.
 

7. Melt the cut edges of the Rigilene strips using a match or candle lighter until they are smooth with no jagged edges. Jagged edges will tear through the fabric in the wash. Note: ideally, melt the tip without burning them, unlike what I did below. If they catch fire, blow them out quickly. Do not do this in the same room with your rats as it releases fumes into the air.


8. Insert the Rigilene strips into the channels in the top piece. There should be at least 1/2" of extra fabric at the raw edge for the seam. If there is not, you may need to trim your Rigilene to make the strip a little shorter.


NOTE: At this point, you might want to sew over the Rigilene strips (either all the way across, or at each end or at the center) to fix the strip in place so that the rats cannot chew a hole and pull the entire strip out.

9.  Fold the top piece back over the bottom piece and align the raw edges, cotton right sides together.
    Pin the raw edges together.


10. Sew along the pinned edge, making sure not to sew over the Rigilene strips.
      Trim the seam allowance.

11. Turn the tunnel right-side out.


Related Posts:
Using Rigilene in your Hammocks

Monday, March 24, 2014

Using Rigilene in Your Hammocks

Hammocks Reinforced with Rigilene

Have you ever wanted to make a cube that can stand upright on its own without needing to be hung from the cage bars? Rigilene may be the solution.

Rigilene polyester boning
What is Rigilene? It is a flexible polyester boning used in strapless dresses and swimwear to provide that extra support that keeps everything "up." It is not as firm as some forms of boning, but it can be sewn directly onto fabric and it is machine washable.

I have found that sewing strips of Rigilene into or alongside of the seams in a cube can help it keep that upright shape without sagging or collapsing.

The nice thing about the Rigilene is that it seems to have that perfect balance of support and flexibility. If it is too stiff, it would be hard to work with and difficult to turn the cube right side out when completed. It also would not collapse for easier storage. If it is too flexible, it won't hold the desired shape and will collapse. In my testing of the self-supporting cube, I have found that when placed in the rat's play pen, it maintained its shape as the rats explored it and wrestled inside it. It will support the weight of a rat on top of the cube, but it likely would not allow the rats to climb on top without giving way. However, the rats seemed to sense this and while they put their front feet up against the top, when they felt the boning start to bend a little, they promptly got down and did not attempt to jump on top. So, during out time, the cube held up great without additional support. At the end of the week, when I change out the hammocks, I will leave the cube in the cage to see how it holds up without support.

The cube can be collapsed and stored by pushing in on one corner until it collapses inward, then folding the structure into a square.

The Rigilene comes on a roll and thus has a natural bend to it. You can iron your cut strips to straighten them out. After washing, a little of the curl did return, but it wasn't too bad. Just a slight bowing in some of the sides.

I test washed the cube and it did lose a little of its perfect shape, but still held up structurally (the picture above was taken after it had been washed). I had read that with Rigilene, you need to burn the cut edges of the boning or wrap the ends in scraps of densely woven cotton, or the sharp edges of the boning will prick the garment wearer. Since I was not making a garment, I did not bother to do this, but I should have. After washing, some of the sharper corners started to poke through the fabric. It didn't help that I was using cheap Easter fabric. So, with subsequent projects, I have been burning the tips of the Rigilene with a candle lighter so that they melt slightly and the edges have a smooth finish. I advise you not do this in the same room with the rats as it does briefly emit a chemical burning smell. Or you can just fold a small piece of tough fabric around the edged before sewing.

Once I had the cube figured out, I wanted to see if I could use this material in some of the other hammocks that would benefit from a little support. The most obvious was the tube - using Rigilene to hold the tube open in a circle at either end. Ironically, it was more difficult to use in the tube than I expected. The difficulty comes with using Rigilene in a perfect circle and still being able to sew it into the tube. My first attempt did not work the way I expected, and I ended up just having to sew the circles into the ends by folding the raw edges into the tube and leaving them exposed. I would like to find a more finished way to do this and will continue experimenting. If I just want the tube held open in a tear-drop shape - that is much easier to do. But in my mind, a tube should be circular.

After my experience with the tube, I realized it would be extremely easy to create a tunnel that sits on the ground, with the rigilene keeping the tunnel upright in a half circle shape. The tunnel was the simplest of the projects I tried and came out just as imagined. I used three strips of Rigilene (front, back, and center) to keep the tunnel open, with about six inches between each strip. Down below you can see that Jo really enjoys the tunnel.


Jo Peeks out from the Tunnel
The last project I tackled was an Easter basket. The basket is basically a modified cuddle cup with a Rigilene structure supporting it, a Rigilene handle wrapped in fabric, and no dipped opening. This was by far the hardest of the projects to implement and I swore that I would not attempt it again. The stitching was absolutely atrocious, because it was hard to guide the structure through the sewing maching. However, the final product, despite all the poor craftsmanship was still very nice. I have an alternate idea for constructing it that I will be trying out. I am not sure if that method will end up being harder or easier, but I like the finished product enough, that I am willing to give it a try.
 
I do not have tutorials for any of these projects yet because I am still working out the kinks. I will add tutorials for the projects that I am able to master when I have things figured out to my satisfaction.


Monday, March 17, 2014

Seamless Cube Added to Tutorials


Seamless has never been my thing. Not that I don't appreciate the polished, finished look to a completely seamless project, but it just seems kind of pointless when our rats just chew up the lining within days of getting a newly sewn item. So much for polished and finished.

Recently, I made some hammocks for a friend's chinchilla. I learned that chinchillas can only use fleece (not cotton) and that everything must be seamless or they may become impacted. That meant I had to go revisit the instructions for the seamless cube.

The biggest drawback for me was that the design I learned from for the seamless cube requires you to hand cut and hand sew the opening. My hand sewing is atrocious and my hand cut and sewn openings look terrible. I would much rather have visible seams on the inside and nice finished openings on the outside than a sloppy lopsided hand-sewn opening leading to a finished interior.

After studying the design for a while, I finally figured out how to add a single machine sewn opening, as long as I was content with only one doorway. So I worked with that and made a seamless all fleece chinchilla cube.

But for our rats, I need front and back doors. If they don't get a back door, they don't waste any time creating their own, and quite frankly, their openings leave a lot to be desired. What good is a seamless cube with a rat chewed hole for a back door?

I let the issue fester in my mind for a while, every now and then revisiting the design to see if I could wrap my head around a solution. And then it came to me. It was actually pretty simple and obvious once I figured it out, and no one was more surprised than me to figure out that it worked. It made me wonder what took me so long to figure it out. As long as the opening panels were across from each other and not next to each other, and as long as I did certain steps in a specific order, I had solved the problem.

I made a couple seamless cubes in my St Patrick's Day hammock sets and got the method down pretty well (my rats have already done their own interior decorating and ripped out some of the fleece "wallpaper" and "carpeting" I worked to hard to make seamless). It took me a few tries to get my corners aligned properly. I tweaked things that I didn't like and improved my techniques, and I now feel pretty comfortable making seamless cubes. The process is not that hard - it is learning the process and visualizing the steps that is hard.

Of course, once I figure something like this out, the next step for me is sharing what I have learned so the next person doesn't need to struggle with the same issues. This tutorial was the most difficult tutorial I have ever written. As hard as it was to learn how to do a seamless cube, it is much harder to try to explain it in words and pictures once you have learned it. Once you know the method, it is not that much more difficult than a regular cube, but it does involve some non-intuitive ways of manipulating the layers of fabric that are really hard to explain and somehow just as hard to demonstrate with pictures. Given that a cube consists of six identical square panels, it becomes even more difficult to tell exactly what you are looking at in a picture.

View from inside a Seamless Cube
To make the pictures as clear as possible, I labeled every side of the cube with a name and then used a different color fabric with a matching color of fleece for each panel: Front Panel (Yellow), Back Panel (Mint), Left Panel (Pink), Right Panel (Purple), Top Panel (Blue), and Bottom Panel (Green). At least that way you could always tell exactly which cube panel you were looking at from the color. When you are pinning together four layers of fabric from two different panels, it is clear at least which fabric belongs to which panel. In the text, I used these panel names extensively. Unfortunately, the colored fabric I used was a cheap broadcloth, since I bought it specifically to do this tutorial and didn't want to spend the money on good fabric. Broadcloth tends to bunch and gather around the stitching and is not as stiff as woven cotton. Any defects of this nature in the finished product are because of the cheap fabric used and not a flaw in the method.

Despite these efforts, this is a more advanced tutorial. It is not one that I would recommend to a beginner. You have to really want a seamless cube to bother with it. The tutorial includes almost 60 pictures because this is one case where it is best not to lump any two actions into one picture, even if they are simple steps.

It is also a tutorial that you just need to work along with. Because it is so hard to visualize, it will be easier to follow along if you are working as you go. If you are trying to picture everything in your head, it can drive you crazy; but if you have the project in front of you, the next step becomes more obvious, even if the words to describe that steps are confusing.

It is my hope that those who really want a seamless cube tutorial will find this helpful. I will gladly take feedback from anyone who has suggestions that might make the tutorial more clear. I think I have done as much as I can with it on my own and it needs a fresh set of eyes to re-evaluate it.

The tutorial is now a part of the Tutorials for Common Rat Hammocks and Accessories. It is saved as a PDF that can be downloaded to your computer from the page linked above.

Wednesday, February 19, 2014

Adding A New Rotary Cutter Mat


I have blogged before about the benefits of using a rotary cutter set to cut fabric for hammocks. Today, I was in JoAnn's and they had 40% off Fiskars cutting supplies, including their rotary cutting mats. I also had a 15% off my entire purchase coupon. So I succumbed to the impulse buy and bought myself a new rotary cutting mat. This one is larger than my old one - it is 24" x 36".

For most hammocks, the standard 18" x 24" is plenty big. But there are a few projects, including Critter Nation furniture pad cage liners (top and bottom level) and the pocket hammock that require cutting pieces that are longer than the mat. This mat is large enough that I can cut fabric for those two projects without having to move the mat or fabric during the cutting process. I can't tell you how many times I have accidentally run the rotary cutter off the mat because I wasn't paying attention - hopefully that accident will be a thing of the past.

Rotary cutters are by no means a necessity, but they sure do make things easier. This larger mat is a luxury item, but since I have been working to make new liners in a variety of colors, it will get a lot of use for a while. It is large and unwieldy, so it will probably only come out for those projects that need it, but I think it will come in handy when it does come out.

Monday, February 3, 2014

Hammocks for Valentine's Day

Over the last several months, I have been working on creating hammock sets for holidays and seasons. I recently created a few nice sets of winter hammocks, made with flannel instead of regular cotton prints for warmth, featuring penguins, skiing raccoons, and snowmen.


But it is February now and I am tired of focusing on snow this winter. I'm sure we will have more winter to come, but we have taken a break from the winter theme to add some Valentine's Day hammocks to our cages. The following is the resulting set:


This is a double set, meant to fill both the Dual Critter Nation and the Martin's R695. This set also includes a floor mat shaped like a candy heart, with the message "BE MINE" embroidered on the front. This floor mat is made with the same materials as the liners and is meant to dress up the cage floor a bit. I am very happy with the way it came out.


Some of the hammocks installed in the DCN

This set also includes a corner hut, a cross between a corner hammock and a cube. While I usually set my cubes flat on the ground and use the ribbon loops to keep it erect, the corner cube works well hung in a corner, as it has ribbon loops to support both the top and the bottom. I make mine with windows on the sides (if I don't, my rats will chew their own windows). I took pictures as I built this hammock, and will be adding it to the list of hammock tutorials soon.


Corner Hut from the front (top) and side (bottom).

Next on the agenda, St Patrick's Day Hammocks.


Monday, January 13, 2014

Hammocks with a Fleece Border


Here is a fun trick I have been working on for dressing up certain types of hammocks: adding a fleece border to the open edges. This works extremely well for pocket hammocks, tunnel pockets, tubes, and double deckers. Not only does it look nice, but it cuts down slightly on the amount of cotton print that you will need, which sometimes comes in handy if you are just a little short. You do need a little extra fleece, but since fleece comes on a wider bolt than cotton, I usually have more fleece than cotton for any given hammock set.

It is really quite simple to modify some of the tutorials in our Tutorials for Common Rat Hammocks and Accessories to create this effect. First, you must decide how wide you want the border to be. I have experimented a bit and I like 1.5 inches per edge, and will use that measurement for the following tutorial.

Pocket Hammock

As an example, I will illustrate how to modify the pocket hammock so that the opening of the pocket has a 1.5" fleece border on both sides.

The pocket flat calls for one piece of cotton and one piece of fleece to be cut in a 15" x 33" rectangle. Because we want a fleece border of 1.5" on each end, our cotton piece can be cut 3" shorter (1.5" x 2 edges = 3" shorter). This means we cut the cotton piece 15" x 30". Since we lost 3" of our cotton, we need to get that length back from the fleece. So we increase the fleece length in the tutorial by 3", to make a 15" x 36" rectangle. Note that the fleece piece will be 6" longer than the cotton piece.

 
Once the fabric is cut to size, the tutorial calls for pinning the cotton to the fleece, right sides together, along the two short ends only. Because we are now working with fabric pieces of different lengths, I recommend doing this one end at a time. So, line up the cotton and the fleece, right sides together, along one of the 15" sides. Pin the edge and sew, trimming the seam allowance and the excess thread.

Now, reposition the fabric pieces so that the other 15" edge is lined up. Pin that edge, and sew. Trim the seam allowance and the excess thread.

 
Once both ends have been sewn together, turn the fabric right side out. Adjust the edges until each end has the same size fleece border (1.5" in this case). Pin the fold to hold the fold in place and top stitch along the edge of the fleece on both sides. I also top stitch along the cotton edge near the seam attaching it to the fleece.


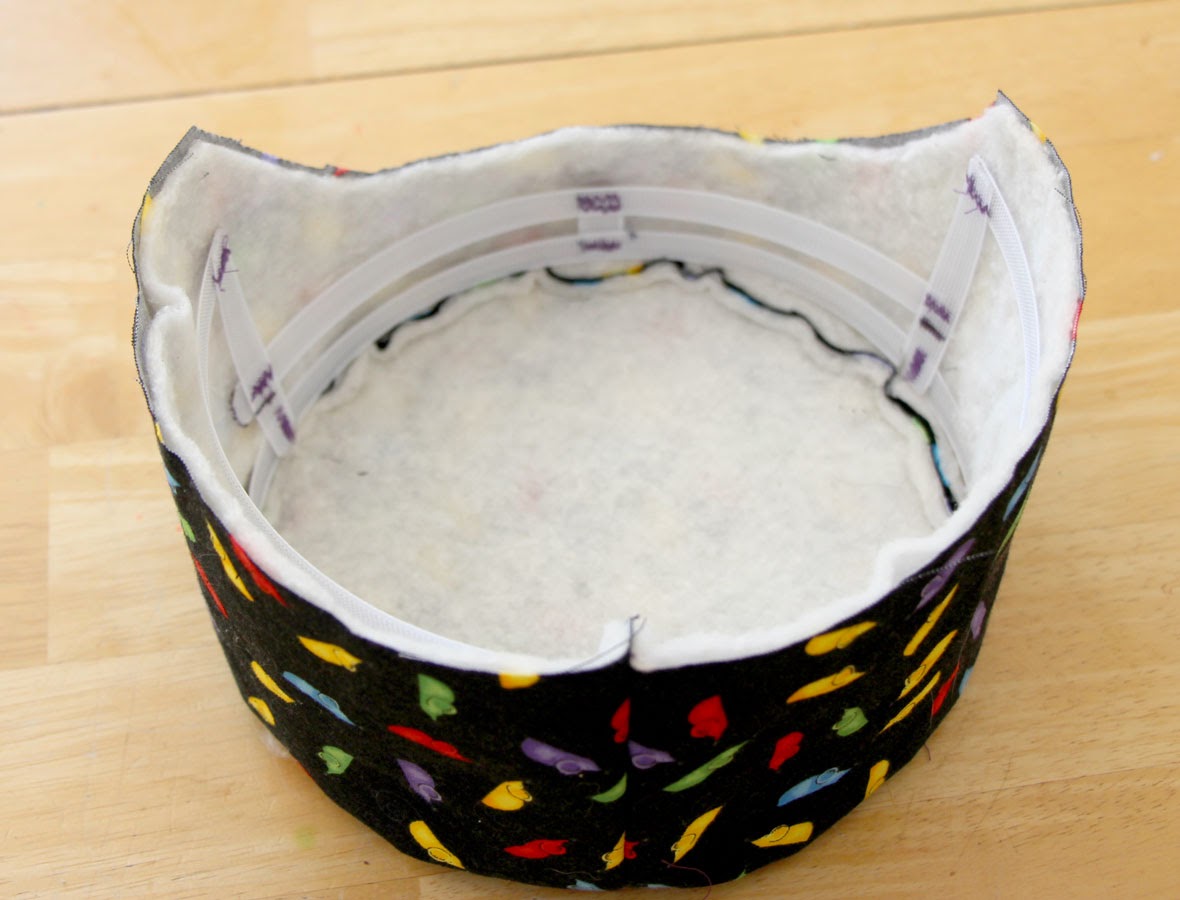
At this point, you follow the rest of the tutorial to complete the hammock. You should get something that looks like this:

Pocket Hammock with Fleece Borders

Tunnel Pocket

You can also modify the tunnel pocket so that the "blanket" on top of the hammock has fleece borders. To do this, instead of cutting the blanket piece to 15" x 10", you should cut it 15" x 7" (assuming a 1.5" border). You should cut the fleece piece to 15" x 13" (again, 6" longer than the cotton piece). Sew the 15"-long edges of the blanket, cotton to fleece, in the same manner as described above for the pocket hammock. To highlight the fleece border, I like to use a different color fleece than the fleece used on the bottom piece.

Tunnel Pocket Hammock with Fleece Borders


Double Decker

Likewise, the double decker can be modified as follows (for a 1.5" border at each opening): Instead of cutting the cotton piece to 13" x 20", cut it 10" x 20". The fleece should be cut 16" x 20". The 20" edges should be sewn together in the same manner as for the pocket hammock.

Double Decker with Fleece Borders

Tube

Finally, the tube can also be created with a fleece border. If using the dimensions provided in the tutorial, instead of cutting the cotton piece to 16" x 19", cut it 16" x 16" (for a 1.5" border). (This makes an 18" tube. If you are making a tube of a different length, cut the cotton length 3" shorter than you normally would cut it.) Cut the fleece piece to 16" x 22" (or 6" longer than you cut the cotton piece). Sew the fleece and cotton together along the 16" sides (where the tube opening will be) in the same manner as described above.

Tube with Fleece Borders

I really like the way that this technique will bring out the fleece color in some hammock styles where you wouldn't normally see much of the fleece, such as the pocket hammock. I find this effect to be more visually pleasing and it gives the hammock a warm snuggly appeal.

I am working on adding the instructions for this technique to the Tutorials for Common Rat Hammocks and Accessories, along with adding instructions for a corner hut (like a cube, but made for hanging in cage corners) and instructions for the U-Haul furniture pad liners as described in a previous blog post. I will post when the updated document is available.